
This document describes how to set up LifeKeeper to use Amazon FSx for NetApp ONTAP.
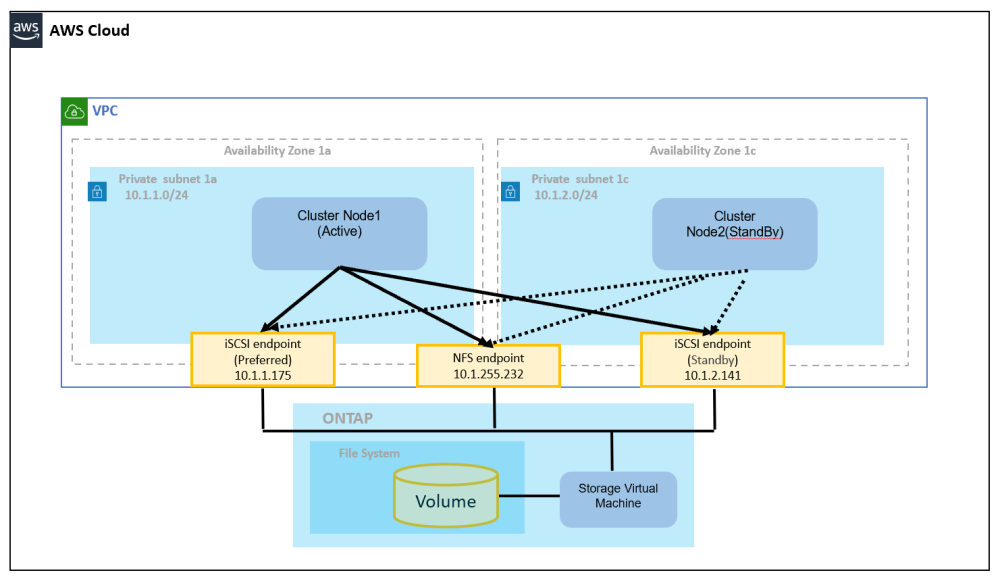
Amazon FSx for NetApp ONTAP can be accessed via the iSCSI protocol or NFS as a shared disk from LifeKeeper. By configuring a multi-AZ, it ensures availability even if one of the Availability Zones (AZ) goes down. The following configurations are supported:
- Multi Path (DMMP) configuration: Multipath is configured for endpoints created for each AZ, and LifeKeeper uses the Device Mapper (DM) Multipath Recovery Kit. In this configuration, RESERVATIONS=none must be set in /etc/default/LifeKeeper to disable SCSI reservations.
- Single Path + SCSI-3 Recovery Kit configuration: The iSCSI LUN of Amazon FSx for NetApp ONTAP is connected in a Single Path configuration, and SCSI reservations can be used via the LifeKeeper SCSI-3 Recovery Kit. The LifeKeeper SCSI-3 Recovery Kit uses SCSI-3 Persistent Reservation as the SCSI reservation.
When accessing via NFS, a route table to the NFS endpoint is configured for each AZ, and the NAS Recovery Kit is used.
Installing LifeKeeper
- If used with the iSCSI protocol, add one of the following Recovery Kits to each cluster node according to the configuration used:
- Multi Path (DMMP) configuration: Device Mapper (DM) Multipath Recovery Kit
- Single Path + SCSI-3 Recovery Kit configuration: SCSI-3 Recovery Kit
- If accessing via NFS, add the NAS Recovery Kit to each cluster node.
- When using the Device Mapper (DM) Multipath Recovery Kit, set RESERVATIONS=none in /etc/default/LifeKeeper to disable SCSI reservations.
- When using the SCSI-3 Recovery Kit, SCSI-3 Persistent Reservation can be used as the SCSI reservation. Also, install the sg3_utils package required to verify SCSI reservations on each cluster node.
- (Option) Set up STONITH according to the STONITH in AWS Environment.
- For configurations where RESERVATIONS=none is set, install Quorum/Witness to prevent split-brain. Considering the AZ where the cluster nodes and ONTAP are located, configure it in a different AZ or region as described in the Quorum/Witness Cluster Recommendations in AWS.
Creating an FSx for NetApp ONTAP file system
- Select Amazon FSx for NetApp ONTAP from the AWS FSx menu and create a file system.
- Select a Standard create option. Supplementary information is provided below:
- For Deployment type choose Multi-AZ. Note: Single AZ configuration is not supported.
- The Preferred subnet and the Standby subnet are assigned to the subnets allocated to each AZ. An iSCSI endpoint is created here.
- In VPC route tables, NFS access points are created. If you are using a route table other than the main route table, select one or more VPC route tables.
- Other fields are optional.
When used with the iSCSI protocol (Multi Path (DMMP) configuration)
https://docs.aws.amazon.com/fsx/latest/ONTAPGuide/mount-iscsi-luns-linux.html
Follow the steps outlined above to configure iSCSI for ONTAP. The explanation here assumes the following values on RHEL 8.10.
Filesystem
Management endpoint DNS name
  management.fs-aaaa.fsx.us-west-2.amazonaws.com
Management endpoint IP address
  10.1.255.204
SVM
bc. Management DNS name
  svm-aaaa.fsx.us-west-2.amazonaws.com
iSCSI DNS name
  iscsi.svm-aaaa.fsx.us-west-2.amazonaws.com
Management IP address
  10.1.255.232
iSCSI IP address
  10.1.1.175, 10.1.2.141
Install the iSCSI packages on each cluster node.
At this time, check the initiator name.
# dnf install device-mapper-multipath iscsi-initiator-utils
# mpathconf --enable --with_multipathd y
# systemctl restart iscsid
# cat /etc/iscsi/initiatorname.iscsi
iqn.1994-05.com.redhat:3034e7ffb0e
Log in to the ONTAP File System management server
Execute lun create and lun igroup create, specifying the initiator name of each cluster node with the -initiator option.
# ssh fsxadmin@management.fs-aaaa.fsx.us-west-2.amazonaws.com
::> lun create -vserver fsx -path /vol/vol1_l/lun_001 -size 1G -ostype linux -space-allocation enabled
::> lun show
Vserver   Path                            State   Mapped   Type        Size
--------- ------------------------------- ------- -------- -------- --------
fsx       /vol/vol1_l/lun_001               online  unmapped linux         1GB
::> lun igroup create -vserver fsx -igroup igroup_001_l -initiator iqn.1994-05.com.redhat:3034e7ffb0e,iqn.1994-05.com.redhat:303eb2a3e0 -protocol iscsi -ostype linux
::> lun igroup show
Vserver   Igroup       Protocol OS Type  Initiators
--------- ------------ -------- -------- ------------------------------------
fsx       igroup_001_l   iscsi    linux  iqn.1994-05.com.redhat:3034e7ffb0e
                                         iqn.1994-05.com.redhat:303eb2a3e0
With lun mapping, ensure that igroup_001_1 has access to lun 001.
::> lun mapping create -vserver fsx -path /vol/vol1_l/lun_001 -igroup igroup_001_l -lun-id 001
::> lun show -path /vol/vol1_l/lun_001
Vserver   Path                            State   Mapped   Type        Size
--------- ------------------------------- ------- -------- -------- --------
fsx       /vol/vol1_l/lun_001               online  mapped   linux         1GB
::> network interface show -vserver fsx
            Logical    Status     Network            Current       Current Is
Vserver     Interface  Admin/Oper Address/Mask       Node          Port    Home
----------- ---------- ---------- ------------------ ------------- ------- ----
fsx
            iscsi_1      up/up    10.1.1.175/24      FsxId0212ef1b4803190af-01
                                                                   e0e     true
            iscsi_2      up/up    10.1.2.141/24      FsxId0212ef1b4803190af-02
                                                                   e0e     true
            nfs_smb_management_1
                         up/up    10.0.255.232/26    FsxId0212ef1b4803190af-01
                                                                   e0e     true
2 entries were displayed.
::> exit
Configure iSCSI on each cluster node
# iscsiadm --mode discovery --op update --type sendtargets --portal 10.1.1.175
10.1.1.175:3260,1032 iqn.1992-08.com.netapp:sn.BBBB:vs.4
10.1.2.141:3260,1031 iqn.1992-08.com.netapp:sn.BBBB:vs.4
# Option for the session 8.
# iscsiadm --mode node -T iqn.1992-08.com.netapp:sn.BBBB:vs.4 --op update -n node.session.nr_sessions -v 8
# iscsiadm --mode node -T iqn.1992-08.com.netapp:sn.BBBB:vs.4 --login
# multipath -ll
Primary Node
# parted /dev/mapper/3600XXXX --script 'mklabel gpt quit'
# parted /dev/mapper/3600XXXX --script 'mkpart Disk1_part1 0% 100% print quit'
Make the partition visible on the backup node.
# parted /dev/mapper/3600XXXX --script 'print quit'Mount it to /disk1 on the primary node.
# mkdir -p /disk1
# mkfs.xfs /dev/mapper/3600XXXX; mount /dev/mapper/3600XXXX /disk1
Create a file system resource.
# lkcli resource create fs --tag /disk1 --mountpoint /disk1
# lkcli resource extend fs --tag /disk1 --dest <BackUp server>
When used with the iSCSI protocol (Single Path + SCSI-3 Recovery Kit configuration)
In the Single Path + SCSI-3 Recovery Kit configuration, the iSCSI LUN of Amazon FSx for NetApp ONTAP is used in the same way as the Multi Path (DMMP) configuration described above. However, multipath configuration is not used; instead, the iSCSI LUN is connected as a certified Single Path configuration.
In this configuration, the LifeKeeper SCSI-3 Recovery Kit is used instead of the Device Mapper (DM) Multipath Recovery Kit. The LifeKeeper SCSI-3 Recovery Kit supports SCSI-3 Persistent Reservation as the SCSI reservation.
Install the iSCSI and SCSI reservation verification packages on each cluster node.
At this time, check the initiator name.
# dnf install iscsi-initiator-utils sg3_utils
# systemctl restart iscsid
# cat /etc/iscsi/initiatorname.iscsi
iqn.1994-05.com.redhat:3034e7ffb0e
Log in to the ONTAP File System management server
The lun create, lun igroup create, and lun mapping operations on the ONTAP File System management server are performed in the same way as the Multi Path (DMMP) configuration described above. Specify the initiator name of each cluster node with the -initiator option.
Configure iSCSI on each cluster node
Run discovery and login for the iSCSI endpoint to be used. In Single Path configuration, multipath configuration is not used.
# iscsiadm --mode discovery --op update --type sendtargets --portal 10.1.1.175
10.1.1.175:3260,1032 iqn.1992-08.com.netapp:sn.BBBB:vs.4
10.1.2.141:3260,1031 iqn.1992-08.com.netapp:sn.BBBB:vs.4
# iscsiadm --mode node -T iqn.1992-08.com.netapp:sn.BBBB:vs.4 -p 10.1.1.175:3260 --login
# lsblk
If necessary, check the status of SCSI-3 Persistent Reservation.
# sg_persist --in --read-keys /dev/sdX
# sg_persist --in --read-reservation /dev/sdX
Primary Node
# parted /dev/sdX --script 'mklabel gpt quit'
# parted /dev/sdX --script 'mkpart Disk1_part1 0% 100% print quit'
Make the partition visible on the backup node.
# parted /dev/sdX --script 'print quit'Mount it to /disk1 on the primary node.
# mkdir -p /disk1
# mkfs.xfs /dev/sdX1; mount /dev/sdX1 /disk1
Create a file system resource.
# lkcli resource create fs --tag /disk1 --mountpoint /disk1
# lkcli resource extend fs --tag /disk1 --dest <BackUp server>
When using via NFS
https://docs.aws.amazon.com/fsx/latest/ONTAPGuide/attach-linux-client.html
Follow the steps outlined above to configure iSCSI for ONTAP. The explanation here assumes the following values on RHEL 8.10.
NFS DNS name
  svm-aaaa.fsx.us-west-2.amazonaws.com
NFS IP address
  10.1.255.232
Create a shared directory /nfs1 in the ONTAP file system.
# mount -t nfs svm-aaaa.fsx.us-west-2.amazonaws.com:/vol1_l /mnt
# mkdir /nfs1 /mnt/nfs1
# umount /mnt
Create a file system resource on the primary node.
# mount -t nfs svm-aaaa.fsx.us-west-2.amazonaws.com:/vol1_l/nfs1 /nfs1
# lkcli resource create fs --tag /nfs1 --mountpoint /nfs1
# lkcli resource extend fs --tag /nfs1 --dest <BackUp server>
Post your comment on this topic.