
Create the ASCS Resource Hierarchy
- In the LifeKeeper Web Management Console Resource Tree , click “Operations”, then “Create Resource Hierarchy” to open the Create Resource Wizard. Select the “SAP” Recovery Kit and click “Next”.
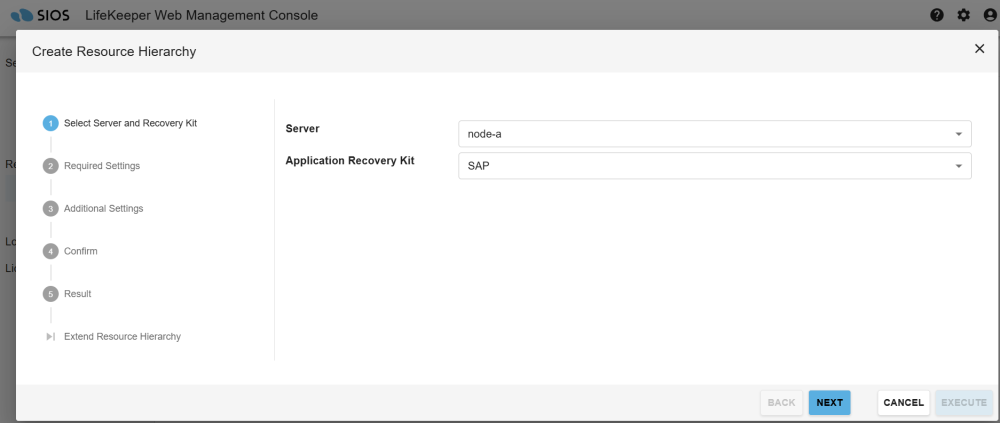
- Enter the following values to create and extend a LifeKeeper resource (SAP-SPS_ASCS10) o protect the ASCS10 instance on node-a and node-b. Notice that the resource is being created on node-a and extended to node-b. Also note that the resulting resource should not be extended to node-c, the witness node. The
![]() icon indicates that the default option is chosen.
icon indicates that the default option is chosen.
| Create Resource Wizard | |
|---|---|
| Server | node-a |
| SAP SID | SPS |
| SAP Instance | ASCS10 |
| SAP Resource Tag | SAP-SPS_ASCS10 |
| Switchback Type | intelligent |
| Virtual IP Resource Tag(s) | none |
| Automate Creation of SAP-related File System Resources | no |
| File System Resource Tag(s) | /usr/sap/SPS/ASCS10,nfs-/export/sapmnt/SPS |
| Protection Level | Full |
| Recovery Level | Full |
| Extend Resource Wizard | |
| Template Priority | 1 |
| Target Server | node-b |
| Target Priority | 10 |
| Switchback Type | intelligent |
| SAP Resource Tag | SAP-SPS_ASCS10 |
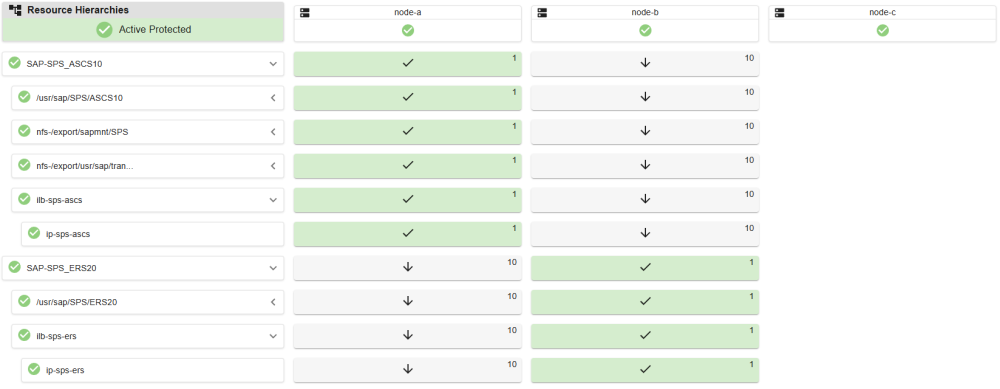
Once the SAP-SPS_ASCS10 resource has been successfully created and extended to node-b, the LifeKeeper Resource Tree should look similar to the following.
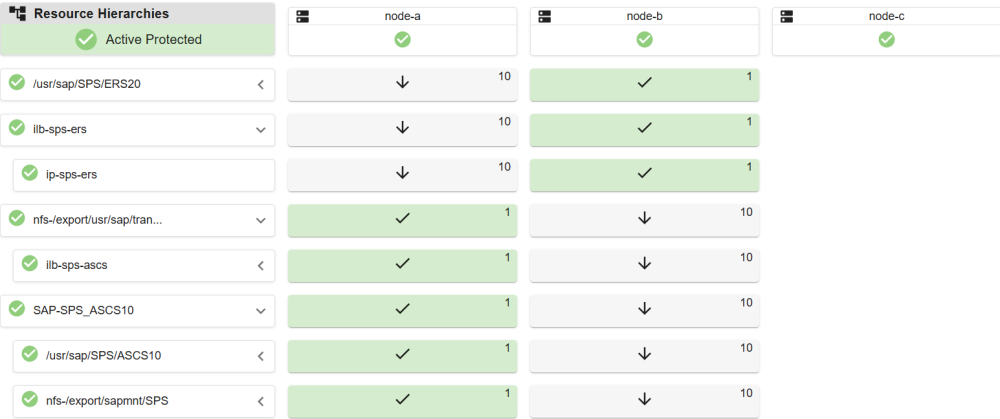
- Right-click on the SAP-SPS_ASCS10 resource and select Create Dependency from the drop-down menu. For Child Resource Tag, select nfs-/export/usr/sap/trans and click “Confirm”, then on the next dialog click Create Dependency to create the dependency.
- Right-click on the SAP-SPS_ASCS10 resource and select Create Dependency from the drop-down menu. For Child Resource Tag, select ilb-sps-ascs and click “Confirm”, then on the next dialog click Create Dependency to create the dependency.
The resulting hierarchy will look similar to the following:
Create the ERS Resource Hierarchy
- In the LifeKeeper Web Management Console Resource Tree, click “Operations”, then “Create Resource Hierarchy” to open the Create Resource Wizard. Select the “SAP” Recovery Kit and click “Next”.
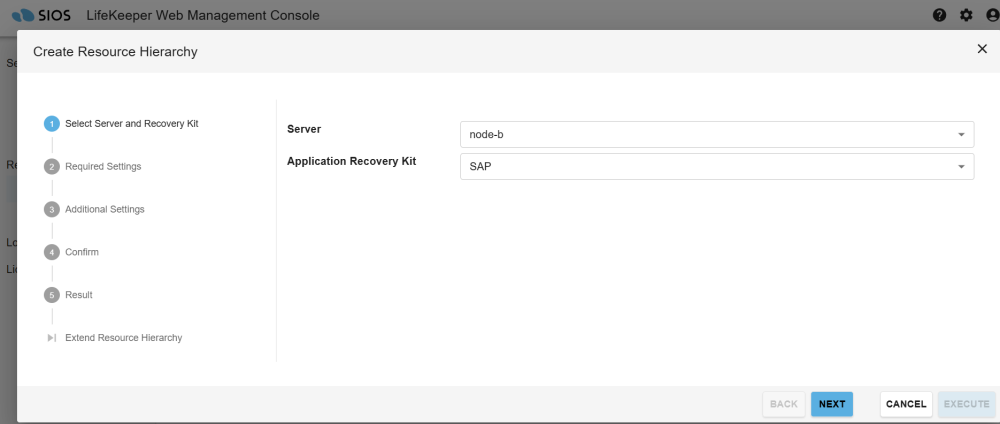
- Enter the following values to create and extend a LifeKeeper resource (SAP-SPS_ERS20) to protect the ERS20 instance on node-a and node-b. Notice that this resource is being created on node-b and extended to node-a. Also note that the resulting resource should not be extended to node-c, the witness node. The
![]() icon indicates that the default option is chosen.
icon indicates that the default option is chosen.
| Create Resource Wizard | |
|---|---|
| Server | node-b |
| SAP SID | SPS |
| SAP Instance | ERS20 |
| SAP Resource Tag | SAP-SPS_ERS20 |
| Switchback Type | intelligent |
| Virtual IP Resource Tag(s) | none |
| Automate Creation of SAP-related File System Resources | no |
| File system resource Tag(s) | /usr/sap/SPS/ASCS10,nfs-/export/sapmnt/SPS |
| Protection Level | Full |
| Recovery Level | Full |
| Extend Resource Wizard | |
| Template Priority | 1 |
| Target Server | node-a |
| Target Priority | 10 |
| Switchback Type | intelligent |
| SAP Resource Tag | SAP-SPS_ERS20 |
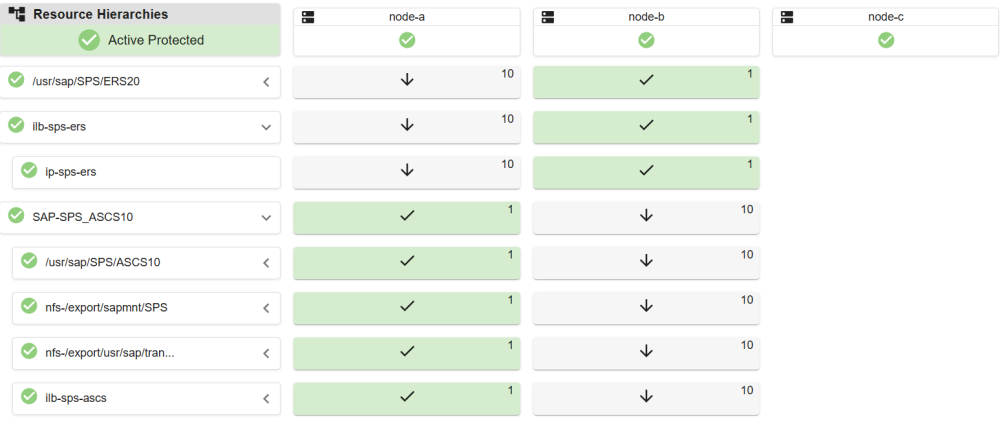
Once the SAP-SPS_ERS20 resource has been successfully created and extended to node-a, the LifeKeeper resource Tree should look similar to the following.
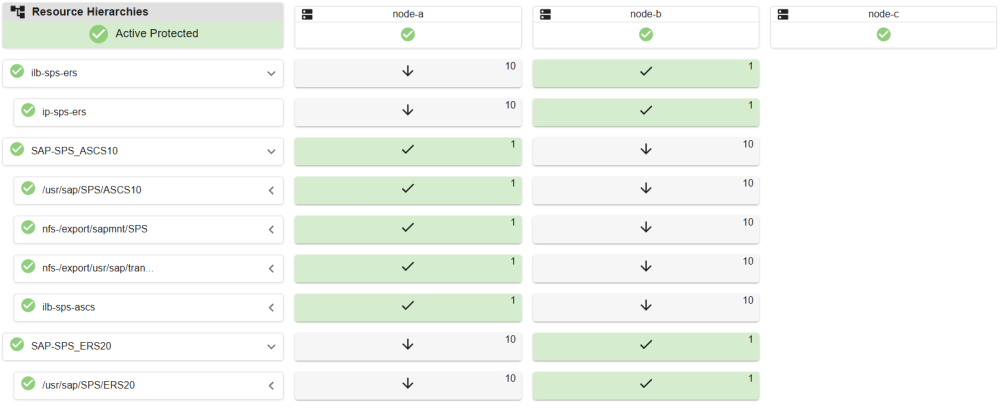
- Right-click on the SAP-SPS_ERS20 resource and select Create Dependency from the drop-down menu. For Child Resource Tag, select ilb-sps-ers and click “Confirm”, then on the next dialog click Create Dependency to create the dependency.
The resulting hierarchy will look similar to the following:
The ASCS10 and ERS20 instances have now been successfully protected by LifeKeeper.
Post your comment on this topic.