
ここではLifeKeeperでAmazon FSx for NetApp ONTAPを使用するためのセットアップ方法を説明します。
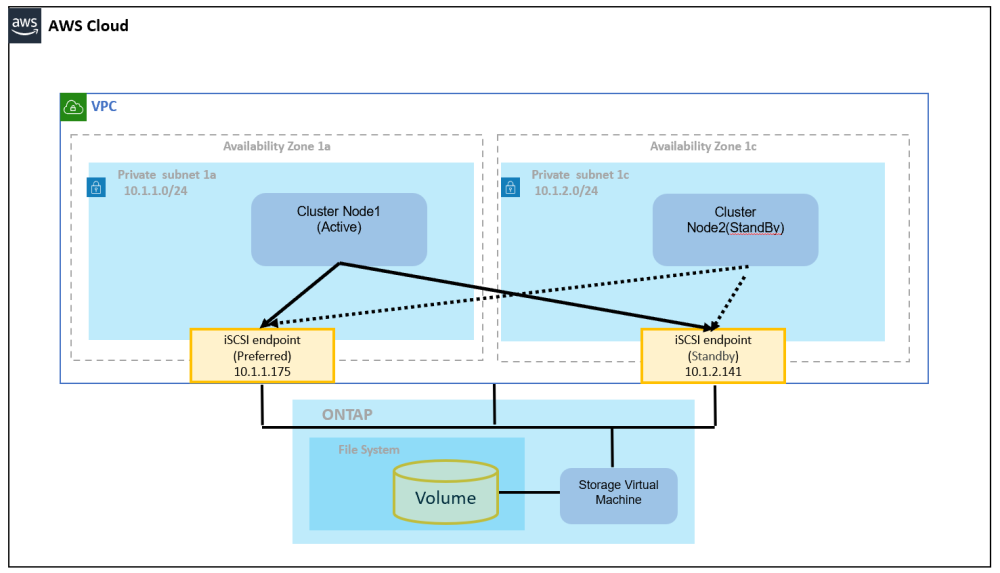
LifeKeeperからは、iSCSIプロトコルでアクセスして、共有ディスクとして使用します。マルチAZ構成にすることにより、どちらの Availability Zone (AZ) がダウンした場合でも対応できるようになります。AZ毎に作成されたendpointに対してマルチパスを設定し、LifeKeeperからはボリュームリソースとして使用します。
LifeKeeperのインストール
スプリットブレイン防止のため、Quorum / Witnessを設定します。クラスターノードとONTAPがあるAZを考慮して、それ以外のAZもしくは別リージョンに LifeKeeper Quorum を参考に設定してください。
FSx for NetApp ONTAPファイルシステムの作成
- AWSのFSxメニューからAmazon FSx for NetApp ONTAPを選択し、ファイルシステム(File system) を作成します。
- スタンダード作成(Standard create) を選択します。以下に補足事項を説明します。
- デプロイタイプ(Deployment type)ではマルチAZ(Multi-AZ)で構成します。注:シングルAZ構成は利用できません。
- 推奨サブネット(Preferred subnet)、 スタンバイサブネット(Standby subnet) には各AZに割り当てられたサブネットを割り当てます。ここにiSCSIエンドポイントが作成されます。
- その他の項目は任意です。
ONTAPのiSCSIの設定
https://docs.aws.amazon.com/ja_jp/fsx/latest/ONTAPGuide/mount-iscsi-windows.html
に従ってONTAPのiSCSIを設定します。ここでは以下を前提に説明します。
Filesystem
管理エンドポイント -DNS名
  management.fs-aaaa.fsx.us-west-2.amazonaws.com
管理エンドポイント -IPアドレス
  10.1.255.204
SVM
管理DNS名
  svm-aaaa.fsx.us-west-2.amazonaws.com
iSCSI DNS名
  iscsi.svm-aaaa.fsx.us-west-2.amazonaws.com
管理IPアドレス
  10.1.255.232
iSCSI IPアドレス
  10.1.1.175, 10.1.2.141
各クラスターノードでMSiSCSIサービスをスタート
このとき、イニシエーター名を確認しておきます。
PS C:> Start-Service MSiSCSI
PS C:> Set-Service -Name msiscsi -StartupType Automatic
PS C:> (Get-InitiatorPort).NodeAddress
iqn.1991-05.com.microsoft:awsnode1.<domain>
ONTAP File System管理サーバーにログインする
lun create, lun igroup createを実行します。このとき各クラスターノードのイニシエーター名を-initiatorオプションで指定します。
# ssh fsxadmin@management.fs-aaaa.fsx.us-west-2.amazonaws.com
::> lun create -vserver fsx -path /vol/vol1_l/lun_001 -size 1G -ostype windows -space-allocation enabled
::> lun show
Vserver   Path                            State   Mapped   Type        Size
--------- ------------------------------- ------- -------- -------- --------
fsx       /vol/vol1_l/lun_001             online  unmapped windows        1GB
::> lun igroup create -vserver fsx -igroup igroup_001_l -initiator iqn.1991-05.com.microsoft:awsnode1.<domain>,iqn.1991-05.com.microsoft:awsnode2.<domain> -protocol iscsi -ostype windows
::> lun igroup show
Vserver   Igroup       Protocol OS Type  Initiators
--------- ------------ -------- -------- ------------------------------------
fsx       igroup_001_l   iscsi   windows iqn.1991-05.com.microsoft:awsnode1.<domain>
                                         iqn.1991-05.com.microsoft:awsnode2.<domain>
lun mappingでigroup_001_1がlun 001にアクセスできるようにします。
::> lun mapping create -vserver fsx -path /vol/vol1_l/lun_001 -igroup igroup_001_l -lun-id 001
::> lun show -path /vol/vol1_l/lun_001
Vserver   Path                            State   Mapped   Type        Size
--------- ------------------------------- ------- -------- -------- --------
fsx       /vol/vol1_l/lun_001             online  mapped   windows        1GB
::> network interface show -vserver fsx
            Logical    Status     Network            Current       Current Is
Vserver     Interface  Admin/Oper Address/Mask       Node          Port    Home
----------- ---------- ---------- ------------------ ------------- ------- ----
fsx
            iscsi_1      up/up    10.1.1.175/24      FsxId0212ef1b4803190af-01
                                                                   e0e     true
            iscsi_2      up/up    10.1.2.141/24      FsxId0212ef1b4803190af-02
                                                                   e0e     true
            nfs_smb_management_1
                         up/up    10.0.255.232/26    FsxId0212ef1b4803190af-01
                                                                   e0e     true
2 entries were displayed.
::> exit
各クラスターノードでiSCSIの設定を行う
次の一連のコマンドをコピーして、.ps1スクリプトを作成し、実行します。今回の例ではiscsi_1は10.1.1.175、iscsi_2 は10.1.2.141に置き換えます。ec2_ipは各クラスターノードのIPアドレスで置き換えます。
#iSCSI IP addresses for Preferred and Standby subnets
$TargetPortalAddresses = @("iscsi_1","iscsi_2")

#iSCSI Initator IP Address (Local node IP address)
$LocaliSCSIAddress = "ec2_ip"

#Connect to FSx for NetApp ONTAP file system
Foreach ($TargetPortalAddress in $TargetPortalAddresses) {
New-IscsiTargetPortal -TargetPortalAddress $TargetPortalAddress -TargetPortalPortNumber 3260 -InitiatorPortalAddress $LocaliSCSIAddress
}

#Add MPIO support for iSCSI
New-MSDSMSupportedHW -VendorId MSFT2005 -ProductId iSCSIBusType_0x9

#Set the MPIO path configuration for new servers to ensure that MPIO is properly configured and visible in the disk properities.
Set-MPIOSetting -NewPathVerificationState Enabled

#Establish iSCSI connection
1..8 | %{Foreach($TargetPortalAddress in $TargetPortalAddresses)
{Get-IscsiTarget | Connect-IscsiTarget -IsMultipathEnabled $true -TargetPortalAddress $TargetPortalAddress -InitiatorPortalAddress $LocaliSCSIAddress -IsPersistent $true}}

#Set the MPIO Policy to Round Robin
Set-MSDSMGlobalDefaultLoadBalancePolicy -Policy RR
両ノードでWindowsディスク管理アプリケーションを起動し、ボリュームを割り当て、LifeKeeprでボリュームリソースを作成します。
このトピックへフィードバック