
This document outlines the steps for updating LifeKeeper for Linux.
Prior to the update, please make sure you review the following general information and restrictions regarding the product you are using.
- Release Notes – Contains information that users should be aware of, including new and deprecated features for each version, bug fixes, system requirements, known issues and restrictions etc.
- Certification Information – Provides information on operating systems, storage, and software versions to be protected that can be used with LifeKeeper.
1: Requirements prior to the update
Before starting the LifeKeeper update, please review the following:
- LifeKeeper Update – contains information on LifeKeeper update requirements.
- Checking Required Packages – For required packages, refer to the Linux Dependencies section in the LifeKeeper for Linux Installation Guide.
2: Updating from LifeKeeper for Linux v9.8.0 or later
When updating from LifeKeeper v9.8.x or v9.9.x, use the setup script to update the core package and optional Recovery Kits.
Note: We recommend performing the update as a rolling upgrade. First, switch all resources from the node being updated to another node, and then proceed with the update while all resources are in the OSU (Out of Service) state; however, if you are using DataKeeper resources, do not perform a switchover immediately after startup; wait until synchronization has completed. (If synchronization is still incomplete immediately after startup, the switchover will fail.)
Follow the steps below.
- Obtaining lkbackup
Execute the following command on both nodes to backup the configuration information.
lkbackup -c
Note: The LifeKeeper configuration backup created in this step will not be used during the update process. It is intended for restoration in case you need to revert to the pre-update environment. - Stopping LifeKeeper
If all resources are not in the OSU state when running the setup script, stop LifeKeeper by executing the following command before running the script.
lkcli stop - Executing the setup script
- Place the product CD image file (LifeKeeper_linux_X-X-X.img) in any directory. In this example, it is stored under /root.
- Use the mount command to mount the product CD image file LifeKeeper_linux_X-X-X.img. In this example, it is mounted to /media/cdrom/.
# mount -t iso9660 -o loop /root/LifeKeeper_linux_X-X-X.img /media/cdrom/ - Run the setup script.
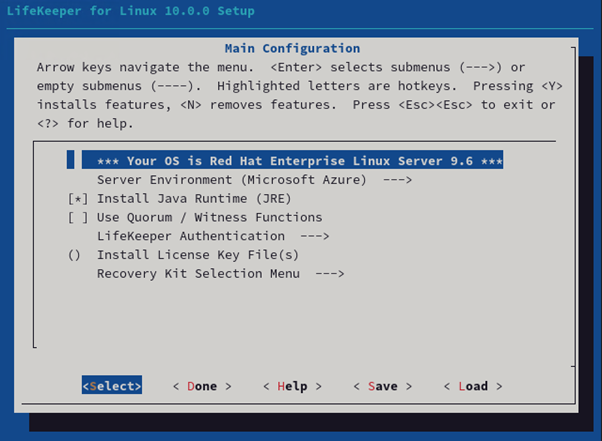
# /media/cdrom/setup - When you run the setup script, the following dialog is displayed.
![]()
- Use the following keys to navigate the menu.。
Key Action ↑ ↓ Navigate between menu items ← → Navigate between the menu buttons at the bottom of the screen ENTER Open the selected sub-menu Y / N / SPACE Turn on, turn off or invert the selected item
The menu buttons at the bottom of the screen are used for the following operations.
Button Action Select Opens a sub-menu dialog screen Done Closes the current screen and returns to the previous screen. Selecting this button on the main screen completes the configuration. Help Displays help for the highlighted item Save Saves the current settings in a configuration file. The saved configuration file can be used for non-interactive installations. Load Loads a saved configuration file - If you only need to update the installed packages, proceed directly with the installation. If additional configuration or packages are required, select them from the menu.
The following items can be configured. Note that irrelevant items are not displayed during an update.- Server Environment (selected value)
Select the platform on which LifeKeeper is running. The ARKs listed in the “Recovery Kit Selection” menu and the behavior of some ARKs may differ depending on the selection here. - Install Java Runtime (JRE)
Select this option when using the traditional Java-based GUI. We recommend using the web-based GUI, LifeKeeper Web Management Console (LKWMC). LKWMC is installed by default starting from version 10.0.0. - Use Quorum / Witness Functions
Select this option when using Quorum/Witness to prevent a split-brain. For more information, refer to the Quorum/Witness section of the Technical Documentation. - LifeKeeper Authentication
Specifies the users who can log in to the LifeKeeper for Linux GUI and their permission levels. When specifying multiple user accounts, separate them with spaces. For details, see Configuring GUI Users. - Install License Key File(s)
To install the license required to start LifeKeeper for Linux, enter the pathname of the license file(s) to be installed. If specifying multiple files, separate them with spaces. - Recovery Kit Selection
Select the ARKs you want to use. - LifeKeeper Startup After Install
Selecting this option starts LifeKeeper for Linux when the installation is complete.
- Server Environment (selected value)
- Installing and updating the selected package
Once you have selected all items, select on the Main Configuration screen. The following screen is displayed.
![]()
To start the update, select Yes. Once the update is complete, the message “Setup Complete.” is displayed. If the update fails, a corresponding error message is displayed. Resolve the issue and then perform the update again.
The setup script is now complete. If LifeKeeper was running before the update, it will start automatically when the setup script finishes. If LifeKeeper was stopped, it will not start automatically. If necessary, start LifeKeeper manually using the lkcli start command.

- Updating on the remaining nodes
Update the packages on the other nodes in the same way.
After completing the update, verify that LifeKeeper has started on each node and check the health status of the resources and servers. Additionally, confirm proper switchover operation and the health of the protected services as necessary.
3: Updating from LifeKeeper for Linux v9.8.0 or earlier
When updating from LifeKeeper v9.8.0 or earlier, you must uninstall LifeKeeper first and then perform a fresh installation. Direct updates are not supported. In this case, the LifeKeeper resource hierarchy and other configurations will be lost. To avoid this, you can temporarily update to a version that supports updates, and then perform the update to the target version.
The steps to uninstall and reinstall LifeKeeper are as follows:
Before Updating
The data replication resource will be recreated, and a full synchronization will be performed. If you are using data replication resources or disks without unique IDs, a warning message will be displayed during LifeKeeper installation or when starting data replication. In such cases, the disk configuration must be repaired. Refer to the “Warning message that netraid mirror does not have a unique identifier” entry in the “Suggested Action” (hereafter referred to as the reference section) in the DataKeeper for Linux Troubleshooting. Follow the steps below to verify and repair the disks in use.
a. Perform steps 1 through 15 in the reference section.
b. Perform steps 2 through 6 in this section.
- If you are using any of the following resources, please refer to the “Requirements” page in the Administration Guide for each resource to ensure that you meet the requirements.
a. Route53: Recovery Kit for Route 53™ Requirements
b. EC2: Recovery Kit for EC2™Requirements
Perform the following steps:
- Obtaining lkbackup
If it becomes necessary to revert to the pre‑update environment, run the following command on both nodes to back up the configuration information for restoration purposes. Copy the generated backup file to another directory, such as the $HOME directory. The default backup file is deleted when LifeKeeper is uninstalled.
lkbackup -c - Stopping LifeKeeper
Execute the following command to stop LifeKeeper.
lkcli stop - Uninstalling LifeKeeper
Execute the following command to uninstall LifeKeeper.
rmlk - Installing LifeKeeper
Refer to the Startup Guide and perform the installation. - Updating on the remaining nodes
Update the package on other nodes using the same procedure. - Reconfiguring LifeKeeper
Reconfigure your comm path configuration and resources to restore the original configuration.
Note: If you are using data replication resources or disks without unique identifiers (as described in the Before Updating section) and have already repaired those disks, pay special attention to the following order when recreating the resources.
- First, create a new replicated file system for each file system, and then extend each resource to all nodes.
- Next, restore the data from the backup to each mount point. (Data will automatically be resynchronized to the target.)
- Recreate the remaining resource hierarchies.
4: Discontinued Recovery Kit
The following Recovery Kits are no longer available. Please note the following when updating.
- Samba Recovery Kit
- Postfix Recovery Kit
- NEC iStorage StoragePathSavior (NEC SPS) Recovery Kit
- HULFT-HUB Recovery Kit
- Raw I/O Recovery Kit
- Generic ARK for JP1/AJS3
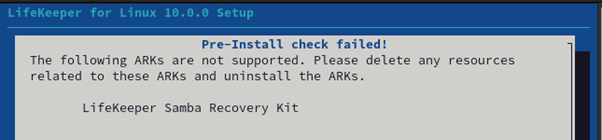
If the Samba Recovery Kit, Postfix Recovery Kit, or NEC iStorage StoragePathSavior (NEC SPS) Recovery Kit is installed
Before updating, delete the applicable resources and uninstall the corresponding Recovery Kit using the setup script for your version. The Recovery Kit can be uninstalled by deselecting it during setup.
If the Recovery Kit has not been uninstalled, the following warning message is displayed during update setup, and the setup process is aborted.
E.g.: If the Samba Recovery Kit is installed
If there are HULFT-HUB Recovery Kit resources
Delete the resources before updating.
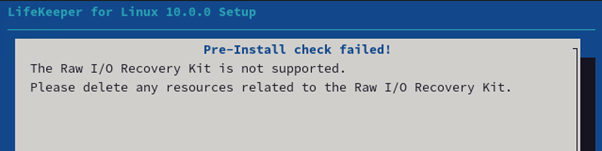
If there are Raw I/O Recovery Kit resources
Delete the Raw Device resources before updating. The Raw I/O Recovery Kit is automatically deleted during the update.
If the relevant resources exist, the following warning message is displayed during the update setup, and the setup process is aborted.
If there are Generic ARK for JP1/AJS3 resources
Generic ARK for JP1/AJS3 has been updated to Recovery Kit for JP1/AJS. Before updating, remove the Generic ARK for JP1/AJS3 resources, and after the update, create the Recovery Kit for JP1/AJS resources. For details, refer to the Recovery Kit for JP1/AJS Administration Guide .
Post your comment on this topic.