
This startup guide provides the minimum necessary steps and related information to start using LifeKeeper. For specific operations of the Linux OS itself, please check the manual of your OS.
- Installing LifeKeeper for Linux
- Starting LifeKeeper
- Configuring the connection (communication path) between HA clusters
If you encounter any problems while following these steps, please contact your support representative.
1: Preparing for LifeKeeper Installation
Before you begin the LifeKeeper installation, verify the following items.
Check the Product Information and Restrictions
- Release Notes: Contains information that users should be aware of, including new features provided in each version, discontinued features, bug fixes, system requirements, known issues and restrictions.
- Certification Information: Provides information on operating systems, storage, and software versions that can be used with LifeKeeper and are supported for protection.
Obtaining the LifeKeeper Product License and Product CD image file
- Obtaining and Installing the License
-
LifeKeeper for Linux requires a unique license for each server. The license is a run-time license, which means that you can install LifeKeeper without it, but the license must be installed before you can successfully start and run the product.
Note: If using newer hardware with RHEL 6.1, please see the IP Licensing Known Issues in the LifeKeeper for Linux Troubleshooting Section.
The Installation script installs the Licensing Utilities package which obtains and displays all of the available Host IDs for your server during the initial install of your LifeKeeper Software. Once your licenses have been installed the utility will return the Entitlement ID if it is available or the Host IDs if it is not.
Note: Host IDs, if displayed will always be based on the MAC address of the NICs.
The new licenses obtained from the SIOS Technology Corp. Licensing Operations Portal will contain your Entitlement ID and will be locked to a specific node or IP address in the cluster. The Entitlement ID (Authorization Code) which was provided with your LifeKeeper Software, is used to obtain the permanent license required to run the LifeKeeper Software. The process is illustrated below.
![]()
Note: Each software package requires a license for each server.
Perform the following steps to obtain and install your license(s) for each server in the LifeKeeper cluster:
- Ensure you have your LifeKeeper Entitlement ID (Authorization Code). You should have received an email with your software containing the Entitlement ID needed to obtain the license.
- Obtain your licenses from the SIOS Technology Corp. Licensing Operations Portal.
a. Using the system that has internet access, log in to the SIOS Technology Corp. Licensing Operations Portal.
b. From the Activation & Entitlements dropdown list select List Entitlements. Note: If changing password, use the Profile button in the upper right corner of the display.
c. Find your Entitlement ID and select each Activation ID associated with that Entitlement ID by checking the box to the left of the line item.
d. From the Action dropdown list select Activate.
e. Define the required fields and select Next.
f. Click on the Green Plus Sign to add a new host.
g. Select and Define the required fields and click Okay. (Note: Internet = IP address, Ethernet = MAC address)
h. Check the box to the left of the Host ID or IP address and select Generate. The Fulfillment ID will display on the License Summary screen.
i. Select Complete.
j. Check the box to the left of the Fulfillment ID and select the Email from the View dropdown list.
k. Enter a valid email address to send the license to and select Send.
l. Retrieve the email(s).
m. Copy the file(s) to a temporary directory on each node. Make sure that the licenses match the MAC address. This path and filename(s) will be used during the ‘Install License Key’ portion of the setup script.

Determining the GUI Used to Operate LifeKeeper
Beginning in LifeKeeper v10.0, the web-based GUI, LifeKeeper Web Management Console (LKWMC), is the default GUI. However, if you need to use the legacy GUI (Java-based GUI, scheduled to be discontinued in the future) for some reason, it is available.
Depending on whether you use LKWMC or the legacy GUI, there are differences in the subsequent environment preparation and installation, so please decide which GUI you will use in advance.
For details about LKWMC, refer to LifeKeeper Web Management Console (LKWMC).
Determining the User for LifeKeeper Installation and Management
This procedure uses the root user for installing LifeKeeper. Ensure that the root user has the same password on all servers in the HA cluster.
Note that different passwords can be set for each server; however, for simplicity in the subsequent steps, the same password is used in this document. In addition, users for managing LifeKeeper can be added or modified at any time. For details on adding or managing users used with LifeKeeper, refer to the Configuring GUI Users section in the product documentation.
Checking the Network Settings Required for Installation
Before installing LifeKeeper, certain operating system and network settings must be configured. If these settings are incomplete, an error message may be displayed during the installation. Review the message and correct the settings as needed.
Check the Connection by IP Address and Name Resolution
Each server in the HA cluster must have an assigned IP address and be able to communicate with the other servers. In addition, the IP address and hostname configured on each server must be resolvable by DNS or the /etc/hosts file. Ensure that the hostname and name resolution settings for all servers are properly configured before installing LifeKeeper.
Checking Firewall Settings
To complete this step, configure the firewall as necessary to allow communication through the following ports.
- When using LKWMC
- REST API server: 5000/tcp
- GUI server: 5110/tcp
For firewall settings related to LKWMC, please also see the LKWMC: Firewall Rules. If you need to change the port number you are using, refer to the LKWMC: Modifying the GUI Server Port and Modifying the REST API Server Port.
- When using the legacy GUI (Java GUI)
- For GUI server communication: 81/tcp, 82/tcp
- For RMI communication between the GUI server and GUI client: All ports from 1024/tcp and above.
In the communication between the GUI server and GUI client used by the legacy GUI, Java RMI randomly uses ports starting from 1024. When applying access control or similar restrictions to the cluster system, consider these ports and configure appropriate packet filtering.
For communication path: 7365/tcp:
Configure the firewall on each server in the HA cluster to allow both incoming and outgoing traffic. The configuration required to complete the steps in the startup guide are now completed. Refer to the following information as needed to check and configure the settings (this can be performed after completing the current procedure).
- When using DataKeeper, IP Recovery Kit, etc.
- When using the Recovery Kit for DRBD
Checking SELinux Settings
LifeKeeper can be used regardless of whether SELinux is enabled or disabled. However, the SELinux mode must be consistent on all servers that make up the HA cluster.
- When using disabled mode
- Make sure it is disabled on all cluster nodes in LifeKeeper.
- When using enforcing mode or permissive mode
- Make sure that all applications running on the HA cluster other than LifeKeeper support SELinux mode.
- If SELinux is enabled, set the SELinux boolean value “mmap_low_allowed” to “on” when installing LifeKeeper.
Checking the settings of the package manager tool (yum or zypper)
When installing LifeKeeper, the package manager tools yum or zypper are used to automatically install LifeKeeper dependency packages. Therefore, yum or zypper must be configured to resolve package dependencies.
Do not lock the package manager’s repository or the rpm database, as this may cause the installation to hang. If dependency packages are not automatically installed via the package manager, refer to Linux Dependencies and install the required packages beforehand.
2: Installing LifeKeeper
LifeKeeper is installed by running the setup script included in the product image file “LifeKeeper_linux_X-X-X.img” (where X-X-X is the version number). The script is interactive, and you will either make a selection for each item or enter the appropriate information.
Notes on this installation procedure
- This procedure uses the root user for all installation tasks.
- LifeKeeper must be installed on every server within the HA cluster. Since the minimum configuration for a LifeKeeper HA cluster is two servers, you must perform the installation on both servers following this procedure.
- The setup script collects information about the system environment and determines the operations necessary to install LifeKeeper. If the system requirements for installation or upgrade are not met, an error message will be displayed and the installation/upgrade will be canceled.
- If any restrictions arise or configuration changes are required, a warning will appear prompting you to continue or cancel the installation. Review the displayed message to determine the appropriate action.
- The setup script’s output, including errors and warnings, is logged to /var/log/LK_install.log. To review error or warning messages after the setup is complete, check /var/log/LK_install.log.
- If the installation is terminated due to an error message or warning, or if there are additional configurations, you can resume by running the setup script again.
- Details such as the LifeKeeper rpm package versions listed in the following procedures may differ from the officially released versions, as they include development-stage information. However, this does not affect the operational steps. Please adjust accordingly to match the version you are using.
Based on the above, start the installation of LifeKeeper.
Running the setup script
- Place the product CD image file (LifeKeeper_linux_X-X-X.img) in any location. In this procedure, it is saved under /root.
- Use the mount command to mount the product CD image file LifeKeeper_linux_X-X-X.img. In this example, it is mounted to /media/cdrom/.
# mount -t iso9660 -o loop /root/LifeKeeper_linux_X-X-X.img /media/cdrom/ - Run the setup script.
# /media/cdrom/setup - When you run the setup script, the following dialog is displayed.
Use the following keys to navigate the menu.
| ↑ ↓ | Navigate between menu items |
| ← → | Navigate between the menu buttons at the bottom of the screen (<Select>, <Done>, etc.) |
| ENTER | Open the selected sub menu |
| Y / N / SPACE | Turn on, turn off or invert the selected item |
| <Select> | Turn the selected item ON / OFF / Opens a sub menu dialog screen |
| <Done> | Closes the current screen and returns to the previous screen. Selecting this button on the main screen completes the configuration and proceeds to the installation. |
| <Help> | Displays help for the highlighted item |
| <Save> | Saves the current settings in a configuration file. The saved configuration file can be used for non-interactive installations. |
| <Load> | Loads the saved configuration file. |
When you select the <Save> and<Load>buttons, a dialog is displayed for entering the setting file name to be used when saving or loading the current settings. If you want to change the default file name, use the [Tab] key to move to the file name field and enter a new name.
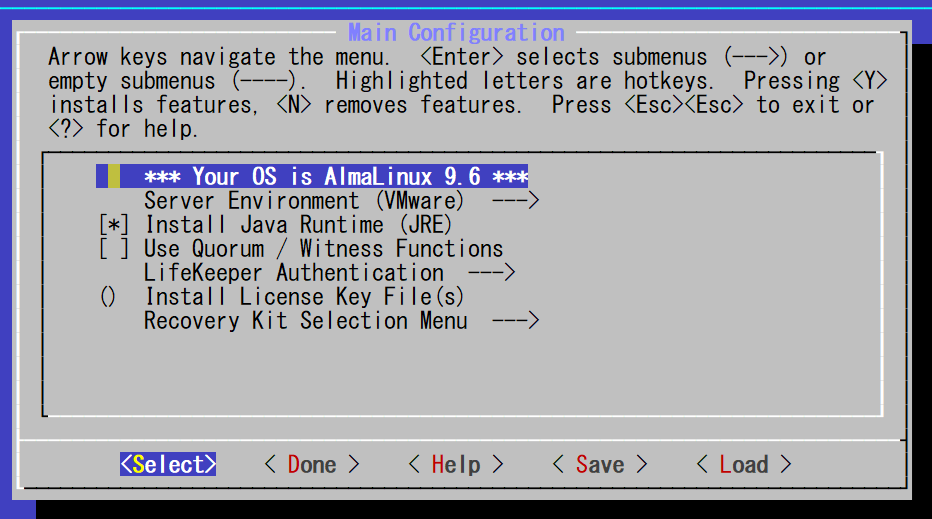
Selecting installation items on the setup script dialog screen
The first dialog screen of the setup script displays the following information.
- Server Environment: Select the platform on which you are installing LifeKeeper. By default, it is automatically selected based on your current environment, so make sure that the displayed information is correct. The type of ARK displayed in the “Recovery Kit Selection” menu and the behavior of specific ARKs may differ depending on the value selected here.
- Install Java Runtime (JRE): Select this option when using the legacy Java-based GUI. The Java used by LifeKeeper refers to the LifeKeeper configuration file (/etc/default/LifeKeeper). Since it does not use OS environment variables, multiple Java versions can coexist. The presence of both the product-bundled Java package and other Java packages does not affect LifeKeeper’s operation. Note that this option will not be displayed if a JRE is already installed.
- Use Quorum / Witness Functions: Select this option when using Quorum/Witness to prevent a split-brain. When using the Quorum/Witness function, it is necessary to install the Quorum/Witness package on all nodes in the HA cluster that uses the Quorum/Witness function (including Witness dedicated nodes). For details on the Quorum/Witness function, refer to the Quorum/Witness section of the Technical Documentation.
- LifeKeeper Authentication: Specifies the users who can log in to the LifeKeeper for Linux GUI. By default, only the root user is assigned to the group (lkadmin) with LifeKeeper administrative privileges. Since this procedure uses the root user, no changes are necessary for this step. Select <Done>.
![]()
To change or add a user, move the cursor to the user group you want to add and select <Select>. Once selected, the following screen will open.
![]()
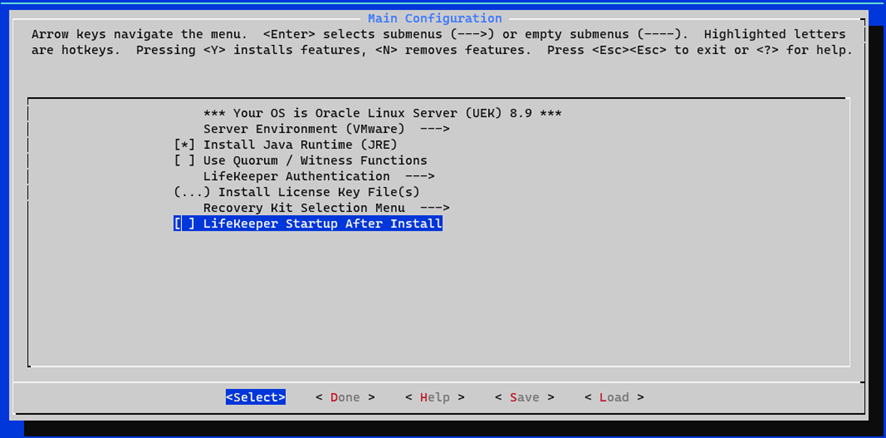
Enter the username to be set in the input field. To set multiple users, enter them separated by spaces. After entering the information, select <Ok>. to enable the settings and return to the previous screen. - Install License Key File(s): Enter the path name of the license file to be installed. You can specify multiple files by separating them with spaces. Please enter the license file you have obtained in advance.
![]()
You can also add a license separately by command after the installation is complete. For instructions on installing licenses using commands, refer to the How to Install a License in the product documentation. - Recovery Kit Selection: Select the Application Recovery Kit to install. Application Recovery Kits are categorized into several types based on common functionalities.
Recovery Kit Type Description Application Suite Recovery Kits that protect applications such as SAP and IBM MQ Networking Recovery Kits that protect network services in the cloud Database Recovery Kits that protect database applications such as Oracle, PostgreSQL, and MaxDB File Sharing / Data Transfer Recovery Kits that protect file sharing or data transfer services such as NFS and HULFT Storage Recovery Kits that protect data storage methods such as DataKeeper (replication), Device Mapper (DM) multipath (DMMP), and Network Attached Storage (NAS) Web Server Recovery Kits that protect web services such as Apache
Note that features for protecting virtual IP addresses, file systems (such as shared disks without replication or multipathing), and other components will be installed regardless of whether they are selected on this screen. - LifeKeeper Startup After Install: This option appears when specifying a license in “Install License Key File(s)”. Selecting this option will launch LifeKeeper for Linux immediately after installation completes. If you do not select this option, use the LifeKeeper startup method described later to start LifeKeeper.
![]()


Starting installation with the selections made in the setup dialog
When you have finished selecting all the items, select <Done> on the Main Configuration screen. The following screen will be displayed.

To begin installation, select <Yes>. The installation progress will be displayed on the screen as the installation proceeds. The installation is complete when “Setup Complete.” is displayed.
If the installation fails, a corresponding error message will be displayed. Review the error message, resolve the issue, and then run the setup script again to perform the installation.
3: Verifying LifeKeeper Startup
To configure the HA cluster connections, LifeKeeper must be running on every server in the cluster. This section describes the related operations necessary for this procedure, including how to start, stop, and check the running status of LifeKeeper.
Starting LifeKeeper
To start LifeKeeper, execute the lkcli start command. The following is an execution example.
# /opt/Lifekeeper/bin/lkcli start
Created symlink /etc/systemd/system/lifekeeper-graphical.target.requires/lifekeeper.service → /usr/lib/systemd/system/lifekeeper.service.
Created symlink /etc/systemd/system/lifekeeper-multi-user.target.requires/lifekeeper.service → /usr/lib/systemd/system/lifekeeper.service.
If you reboot the OS after starting LifeKeeper with the lkcli start command, the LifeKeeper process will automatically restart. To prevent LifeKeeper from starting after an OS reboot, you must stop LifeKeeper following the steps below before shutting down the OS.
Stopping LifeKeeper
To stop LifeKeeper, execute the lkcli stop command. The following is an execution example.
# /opt/Lifekeeper/bin/lkcli stop
Removed /etc/systemd/system/lifekeeper-graphical.target.requires/lifekeeper.service.
Removed /etc/systemd/system/lifekeeper-multi-user.target.requires/lifekeeper.service.
The lkcli command used here has other functions. For details, please refer to the product documentation LifeKeeper Command Line Interface (LKCLI).
Checking if LifeKeeper is running
You can use the lktest command to check if LifeKeeper is running. The following is an execution example.
# /opt/LifeKeeper/bin/lktest; echo $?
F   S UID      PID   PPID  C  CLS PRI  NI SZ	STIME    TIME   CMD
 4 S root     21032 20984 0   TS   39 -20 6561  00:54  00:00:00 lcm
 4 S root     21040 20990 0   TS   39 -20 7049  00:54  00:00:00 ttymonlcm
 4 S root     21044 20983 0   TS   29 -10 14374 00:54  00:00:00 lcd
0
As shown above, make sure that the process name is displayed and the return value of the lktest command is 0.
The lktest command checks the status of LifeKeeper’s core processes and displays results obtained from the ps -cwf command. Multiple lines may be output depending on the running processes, but this is normal behavior. If LifeKeeper is stopped, the core processes will not be displayed as shown above, and the prompt will return. Start LifeKeeper before proceeding to the next step.
Begin configuring the LifeKeeper HA cluster by following the steps below.
Before proceeding to the next step, ensure that LifeKeeper has been installed and started on all servers in the HA cluster with the procedures described above.
4: Logging in to the LifeKeeper Management Console using the GUI
To create a cluster system with LifeKeeper, you must first set up “communication paths” between the servers that make up the HA cluster. Then, create “resources” to define what is to be protected. This document explains how to configure communication paths and create file system resources. (The LifeKeeper Web Management Console (LKWMC) is used to configure LifeKeeper. If you are using the legacy GUI, see Using the legacy GUI).
For information on browsers that can be used for connection, please refer to System Requirements.
Enter the following in the address bar of the browser you are using for the connection.
https://{IP address or host name of the server where LifeKeeper is installed}:5110/lkgui/#/
If the connection is successful, the login screen will be displayed in the browser as shown below.
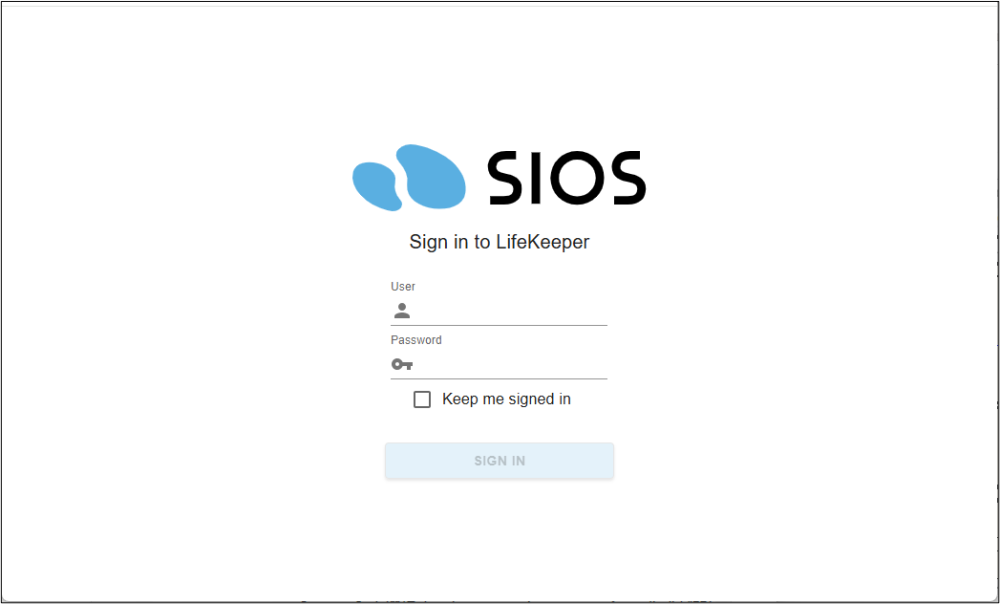
On the login screen, enter root for the User field, and enter the OS root user’s password in the Password field.
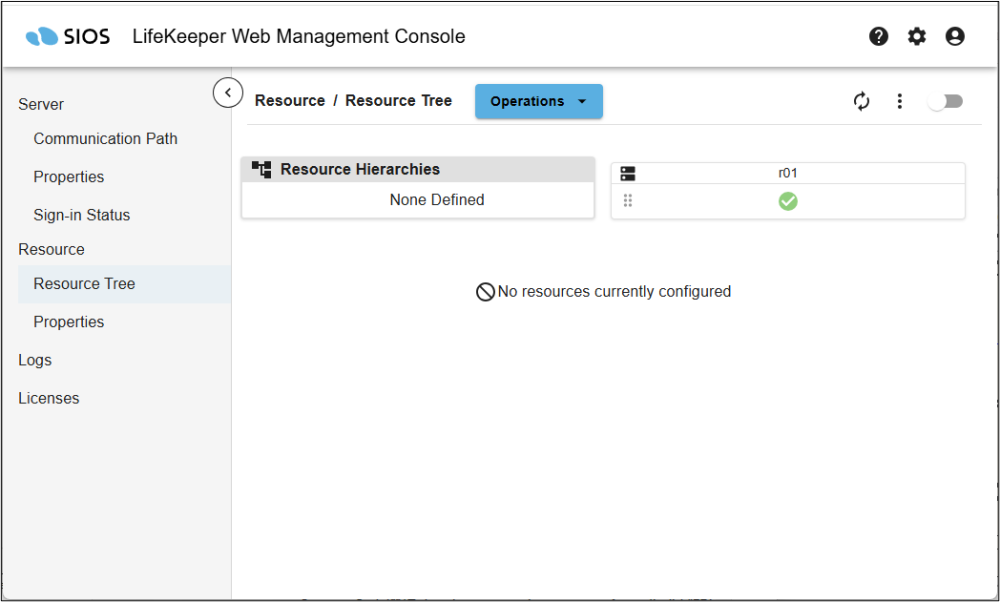
If you successfully log in, the following screen is displayed.
If any errors occur after connecting, please check the following:
- The LifeKeeper core is running
- Refer to the ”Verifying LifeKeeper Startup” section of this document.
- The LKWMC GUI server and REST API server is running
- Refer to the LKWMC Manual Quick Start Guide: Prerequisites to verify that no required settings are missing.
- There are no issues with the network connection between the client running the browser and the server
- Verify that there are no issues with basic network connectivity and that there are no problems with the firewall settings on the server or client. For information on firewalls related to LKWMC, refer to Firewall Rules.
- There are no issues with the name resolution of the destination host name and the configured IP address
- Check if there are any problems with the settings of the hosts file or DNS.
If the issue persists after checking the above points, please contact support.
5: Creating a Communication Path
To create an HA cluster system with LifeKeeper, you must configure “communication paths” between the servers that make up the HA cluster. Then, create “resources” to define what is to be protected. This document explains how to configure communication paths and create file system resources.
Click Communication Path in the left pane of the Management Console to open the Communication Path management screen.
Click the Operations button displayed in the central screen, then select Create Communication Path from the drop-down menu to display the creation dialog.
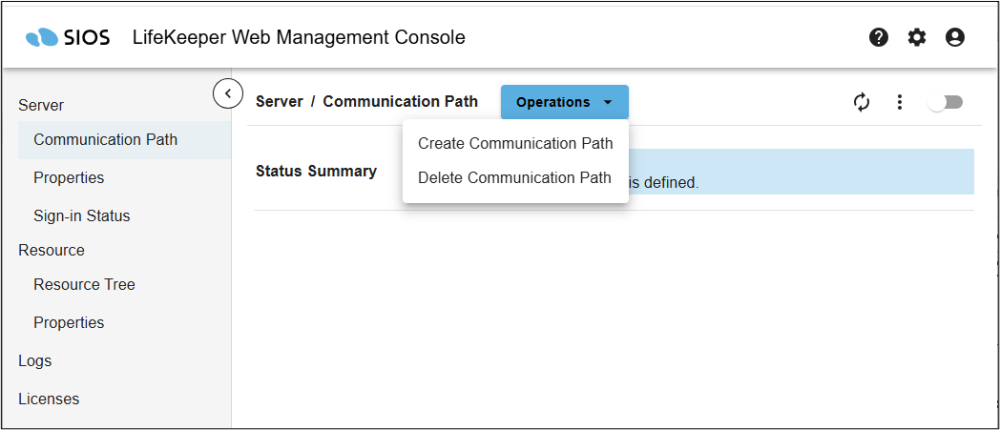
In the communication path creation dialog, enter the necessary information and click Confirm.
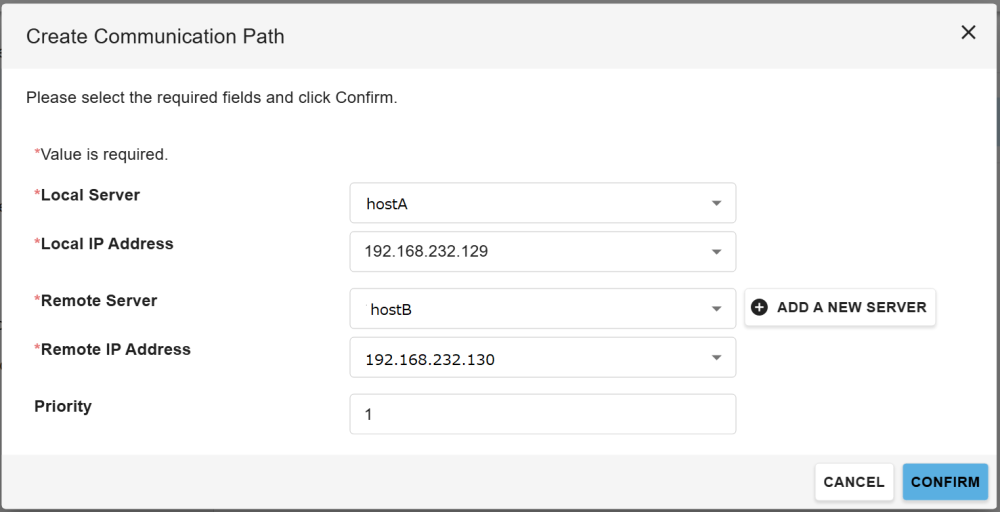
Details for each field are as follows.
- [Local Server]
Select the server for which to create the communication path. The list of local servers contains a list of servers to which LKWMC is currently connected. - [Local IP Address]
Select a valid IP address for [Local Server]. - [Remote Server]
Select the remote server for which to create the communication path. If the destination server is not displayed in the drop-down menu, press the ADD A NEW SERVER button to the right of the Remote Server field.- In the form that appears after pressing Add a New Server, enter the IP address or host name of the server to be added and click Confirm.
- The sign-in confirmation form will appear. Enter the username and password configured for the server you entered to authenticate. If authentication succeeds, you can set the new server as the remote server when creating a communication path.
- [Remote IP Address]
Select a valid IP address for [Remote Server]. - [Priority]
You can set the priority for communication paths between [Local Server] and [Remote Server]. Values from 1 to 99 can be set, with 1 being the highest priority and 99 the lowest. By default, the highest available priority value between [Local Server] and [Remote Server] is entered, so no change is necessary unless there is a particular reason.
After entering all the values and pressing the [CONFIRM] button at the bottom, a confirmation screen displaying the settings will appear.
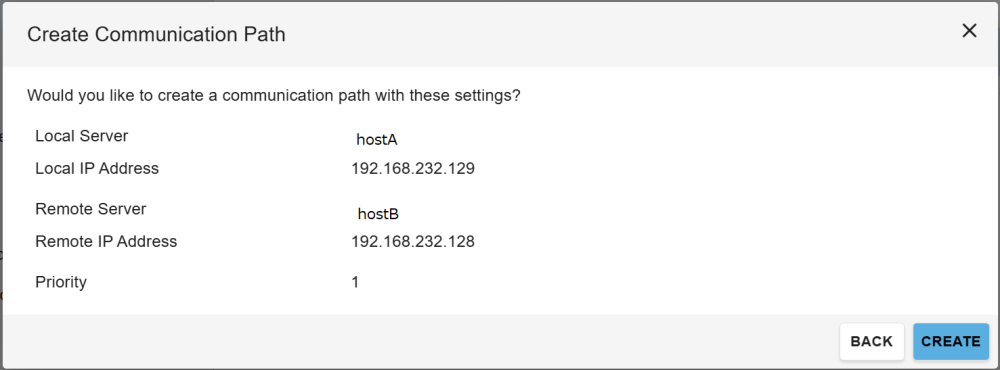
After checking the input values, click CREATE to start creating communication paths. Once completed, the communication path creation results will be displayed.

Click Create Another Communication Path on the creation results screen to create communication paths consecutively. To finish configuring communication paths, click CLOSE.
The communication path configuration is now complete.
After configuring, verify that the communication path status is “ALIVE” from the communication path management screen. Below is an example.

If a communication path connection issue occurs, the status will be shown as DEAD. If the status does not become ALIVE, verify the following in addition to all previously performed steps:
- Refresh the browser to check for status changes
- Status reflection on the screen may be delayed. Please refresh your browser to check the status.
- LifeKeeper core is running
- Refer to the “Verifying LifeKeeper Startup” section of this document.
- Communication is enabled via the communication path port (7365/TCP)
- Check the firewall settings of all hosts to which the communication path is connected.
If the issue persists after checking the above points, please contact your contracted support desk.
If at least one communication path is configured and the status is ALIVE, you can proceed to the next step.
6: Configure the resource hierarchy
Create the resources to be protected by LifeKeeper. The necessary prerequisites and configuration settings differ for each resource type. For specific details on resource creation, refer to the individual Administration Guides under Recovery Kit in the product documentation. This guide only covers the basic steps for launching and navigating the resource creation screen.
To create a resource, click Operations on the Resource Tree screen and select Create Resource Hierarchy from the drop-down list.
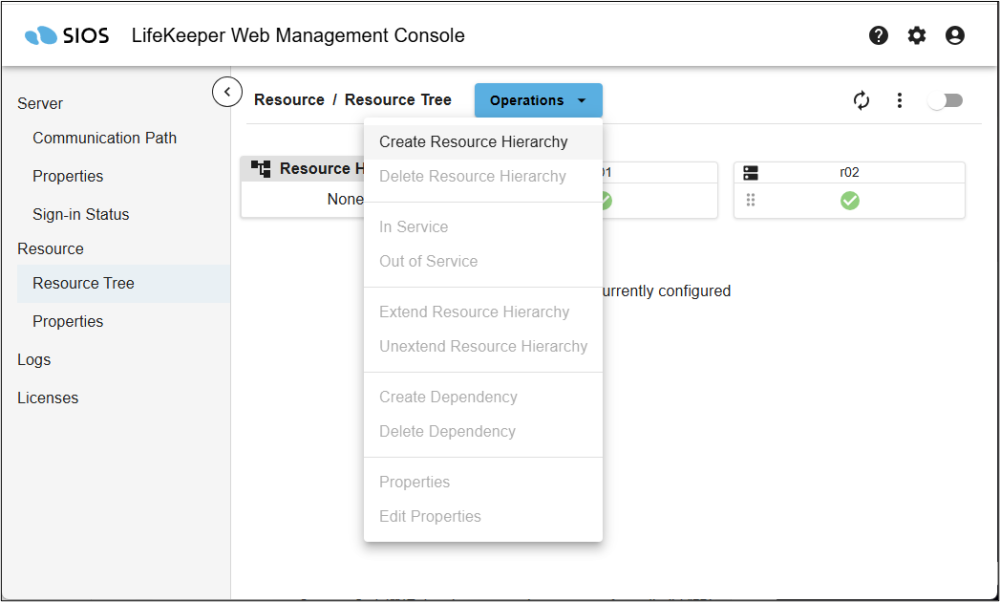
Follow the steps below to create a resource:
- Check the prerequisites for the resources to be protected and make the necessary preparations
The Administration Guide for each Recovery Kit contains information such as the prerequisites required to protect applications.Review this information and configure the necessary settings for the protected application. - Select the server and Recovery Kit
Select the server where you want to create the resource and the Recovery Kit type for that resource. The list of available Recovery Kits will only display those that are enabled on the selected server. - Enter the required items
Enter the required values for creating the resource. The input items depend on the Recovery Kit used. - Enter advanced settings
Enter optional items required for creating the resource. Since default values are populated for all fields, you can skip this step by clicking Next. - Verify input values
After confirming that there are no problems with the entered values, click [EXECUTE] to execute the resource creation.
After confirming that the entered values are correct, click EXECUTE to create the resource. - Execution
Resource creation is executed, and the execution log and results are displayed on the screen. Once resource creation is complete, you can then continue to extend the resource hierarchy.
If you need a more specific resource creation example, please refer to the Evaluation Guide.
After completing resource configuration, you can switch resources or perform checks via LKWMC. For other LKWMC operations, refer to the GUI section of the LKWMC document.
Post your comment on this topic.